I’m in the process of reorganising my shed, and especially the location of where all my tools are laid out. This is potentially going to be a much bigger job than I originally anticipated but the first part of the journey involves looking at ways I can make better use of the space and storage opportunities that I have. I have moved some of the shelving units in my shed around, and this means that one end of the shelving unit is now near the door – and I’ve also been looking for somewhere where I can hang my PPE a little more easily, rather than in the storage buckets that I am currently using. FInally, I’ve been wanting to try out some of my new tools – pocket hole jigs and straight edge cuts for circular saws – and this seemed like a great way to do that. Hence: the shelf pegboard frame
- Building the frame
I’m part of the Kreg community on Facebook, and if there’s one thing that they talk about, it’s pocket hole joints. I’m not an expert in this, but I do have a K4 jig, and I do want to see whether it works well for creating a frame This is something that I’ve been considering for framing a much larger pegboard.
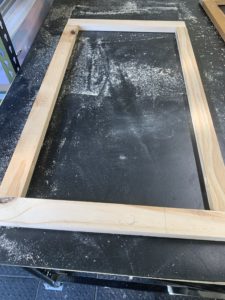
Anyway, I used the jig to drill pocket holes in the width of the frames (after cutting them on the mitre saw). In hindsight, I could probably have done it into the length. The width was interesting as it was actually wider than the 38mm that the jig accommodates – even if it was only by a couple of mms. It was also a bit tricky clamping the wood to the jig, as it was quite narrow, but I managed.
The other thing that I did differently for this frame was that I clamped the two pieces of wood together before I drove in the screws. This made a much bigger difference – the two pieces fit together much more snugly once the screws were driven home.
- Cutting the pegboard
The next step was cutting the pegboard to fit. Again, this is something that I’ve not done well in the past, as I found it hard to keep the saw straight (even when I tried to brace it with a guide piece of timber. However, this time I used the Kreg Straight Edge and the sled that fits the circular saw It went very smoothly. I know that some people recommend cutting the blue parts of the rail to ensure that there is zero clearance -and I can see how that might give a better and more exact finish, but this is more than suitable for my purposes.
- Attaching the pegboard
I was going to attached the pegboard to the frame using brad nails from my new nail gun. However, I quickly found out that the nails were much too long – they went right through the pegboard and the frame, even when I turned down the pressure. Instead, I just screwed them in with normal timber screws.
- Hanging the frame
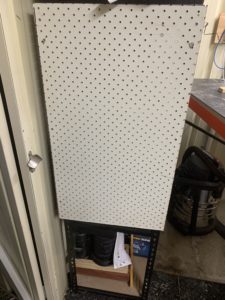
Finally, I hung the frame on the shelving unit by screwing in some blocks to the struts of the shelving unit, and then screwing through the frame into them to clamp it tight.
Done!